*Watch the full video guide above before or after reading to see each step in action.
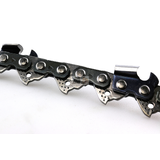
Keeping your chainsaw chain sharp is critical for clean cuts and safe operation. If you're looking for a more precise and efficient method than hand-filing, a bench-mounted grinder is the tool for you. In this guide, you’ll learn how to use a chainsaw grinder correctly to sharpen your chain without damaging the cutters.
Step 1: Choose the Correct Grinding Disc
Before you begin, make sure you’re using the right size grinding disc for your chain. This detail is usually found in your grinder’s manual or the chain’s specifications.
Using the correct disc ensures proper sharpening without damaging the cutter or tie straps.
Step 2: Set the Top Plate Angle
At the back of the grinder, locate the top plate angle adjustment knob. Set this to match the recommended angle for your specific chain type. This angle is crucial for restoring the proper cutting edge.
Step 3: Adjust the Side (C) Angle
On the front of the grinder, set your side or “C” angle. Keep the adjustment loose initially so the grinding wheel can drop down and make full contact with the cutter at the correct angle.
Proper alignment here ensures each cutter is sharpened evenly and accurately.
Step 4: Set the Chain Stop
Move the chain so the cutter is positioned under the grinding wheel. Then:
Adjust the chain stop so it sits just behind the cutter you’re sharpening.
Lock it in place once the grinding wheel touches the very front of the cutter tip.
This ensures consistency across each sharpening stroke and prevents over-grinding.
Step 5: Adjust the Depth Stop
Before grinding, lower the wheel and adjust the depth stop (also called the depth gauge):
Set it so the grinding wheel doesn’t cut into the tie strap.
Test the wheel drop—it should touch the cutter edge without going too far.
This step protects the chain’s structural integrity.
Step 6: Begin Sharpening
Now you're ready to grind:
Power on the machine using the start button.
Lower the wheel gently onto the cutter.
Apply only light pressure—if you push too hard, you'll overheat and burn the cutter.
Sharpen one cutter at a time. After finishing, loosen the clamp, move to the next cutter, and repeat the process.
Step 7: Switch to the Opposite Side of the Chain
Once one side is done:
Loosen the adjustment under the grinder base.
Rotate the grinding head to the opposite angle for the other side of the chain.
Tighten it in place so it doesn’t move during sharpening.
Position the next cutter under the wheel, bring it up against the chain stop, and continue sharpening on this side.
Final Tips for Using a Chainsaw Grinder
Always wear eye protection and gloves during operation.
Keep the grinding disc clean and properly dressed for even results.
Avoid overheating—burnt cutters lose hardness and wear out faster.
Check and adjust your grinder settings regularly to maintain accuracy.
Conclusion: Make Chainsaw Maintenance Easy and Accurate
Now that you know how to use a chainsaw grinder, you can sharpen your chains quickly, accurately, and safely. With the right setup and a little patience, your chain will perform like new—making cutting faster and smoother.
Looking for high-quality sharpening gear? Browse our selection of chainsaw equipment designed for Australian conditions. Stay sharp—and keep your saw running at its best.
With a passion for business that started at just ten years old—when he and Grant, ran a worm farm out of an old bathtub—Charlie has played a key role in growing Jono & Johno into a trusted name in the industry. He oversees product sourcing, customer education, and the company’s online growth, ensuring customers have access to the right equipment and information to get the job done.
Through years of experience, Charlie has developed a deep understanding of the outdoor power equipment industry and is dedicated to helping customers find the right gear, troubleshoot common issues, and keep their machines running smoothly.
* Watch the video above for a hands-on demonstration before or after reading this guide.
If you're looking for a straightforward, no-power-tools method to maintain...
Maximise your chainsaw's cutting power with these essential maintenance tips. Get reliable performance with quality chainsaws and parts from Jono & Johno....