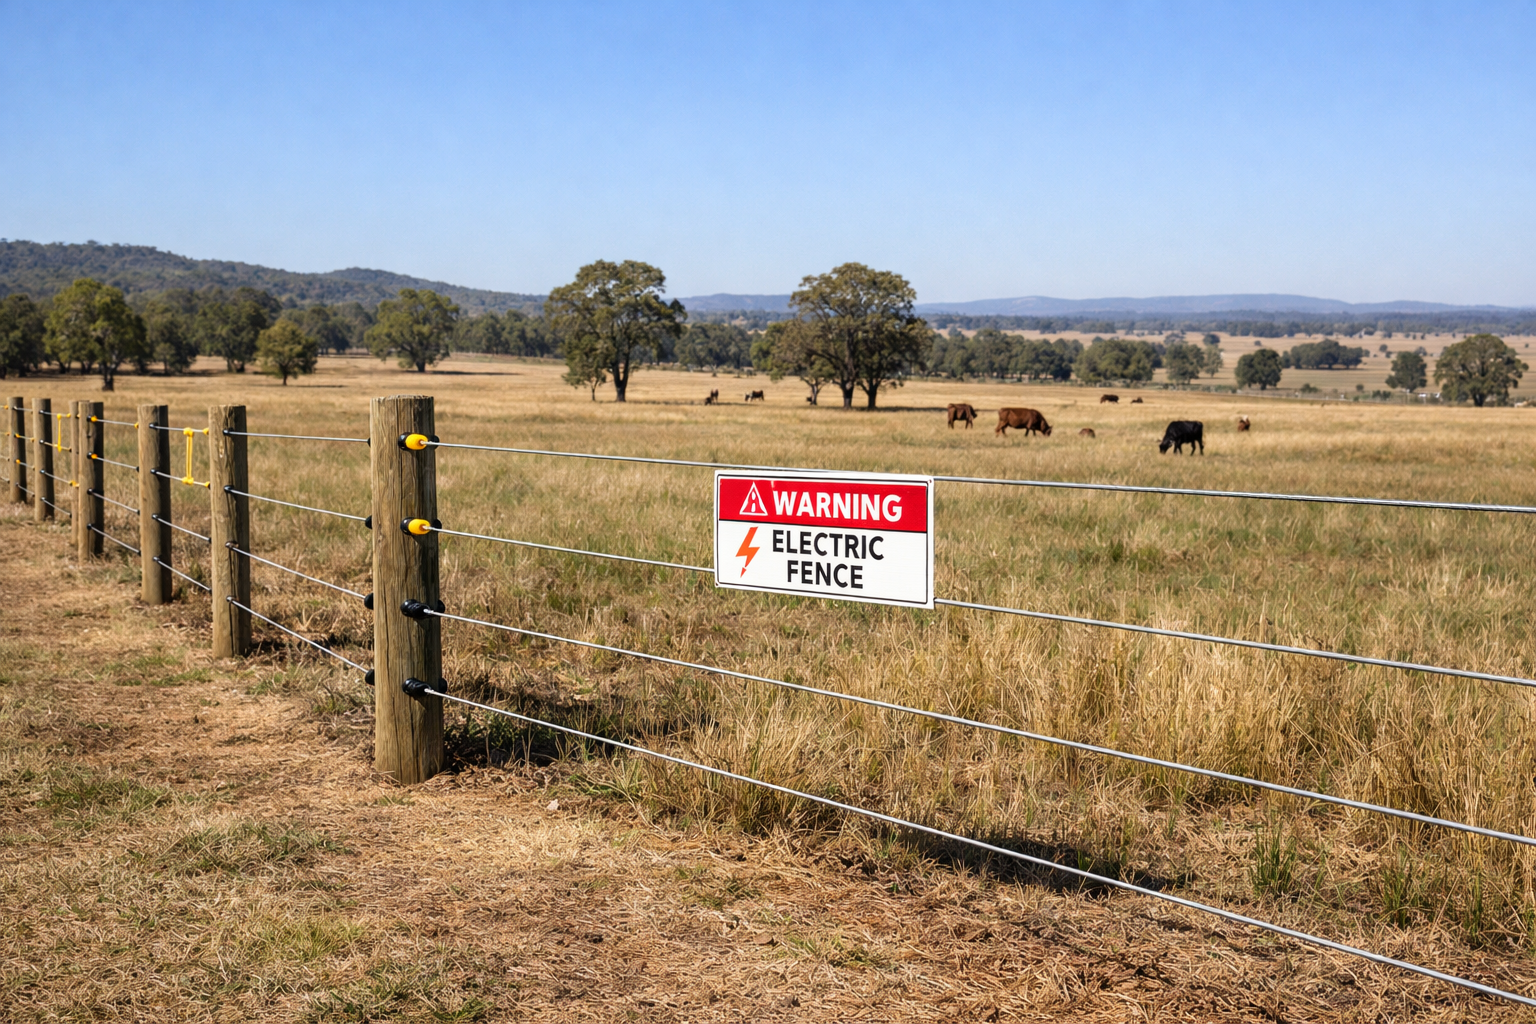
If you have ever watched livestock push through weak fencing or wander exactly where they should not be, you know how quickly small gaps turn into big problems. An electric fence gives you a smarter solution. It creates a clear boundary that animals learn to respect after just one or two safe encounters.
Setting one up is not as complicated as it sounds. With the right layout, components, and grounding, you can build a system that works reliably in Australian conditions. This guide walks you through how to set up an electric fence so you can get it right the first time.
What You Need Before You Start
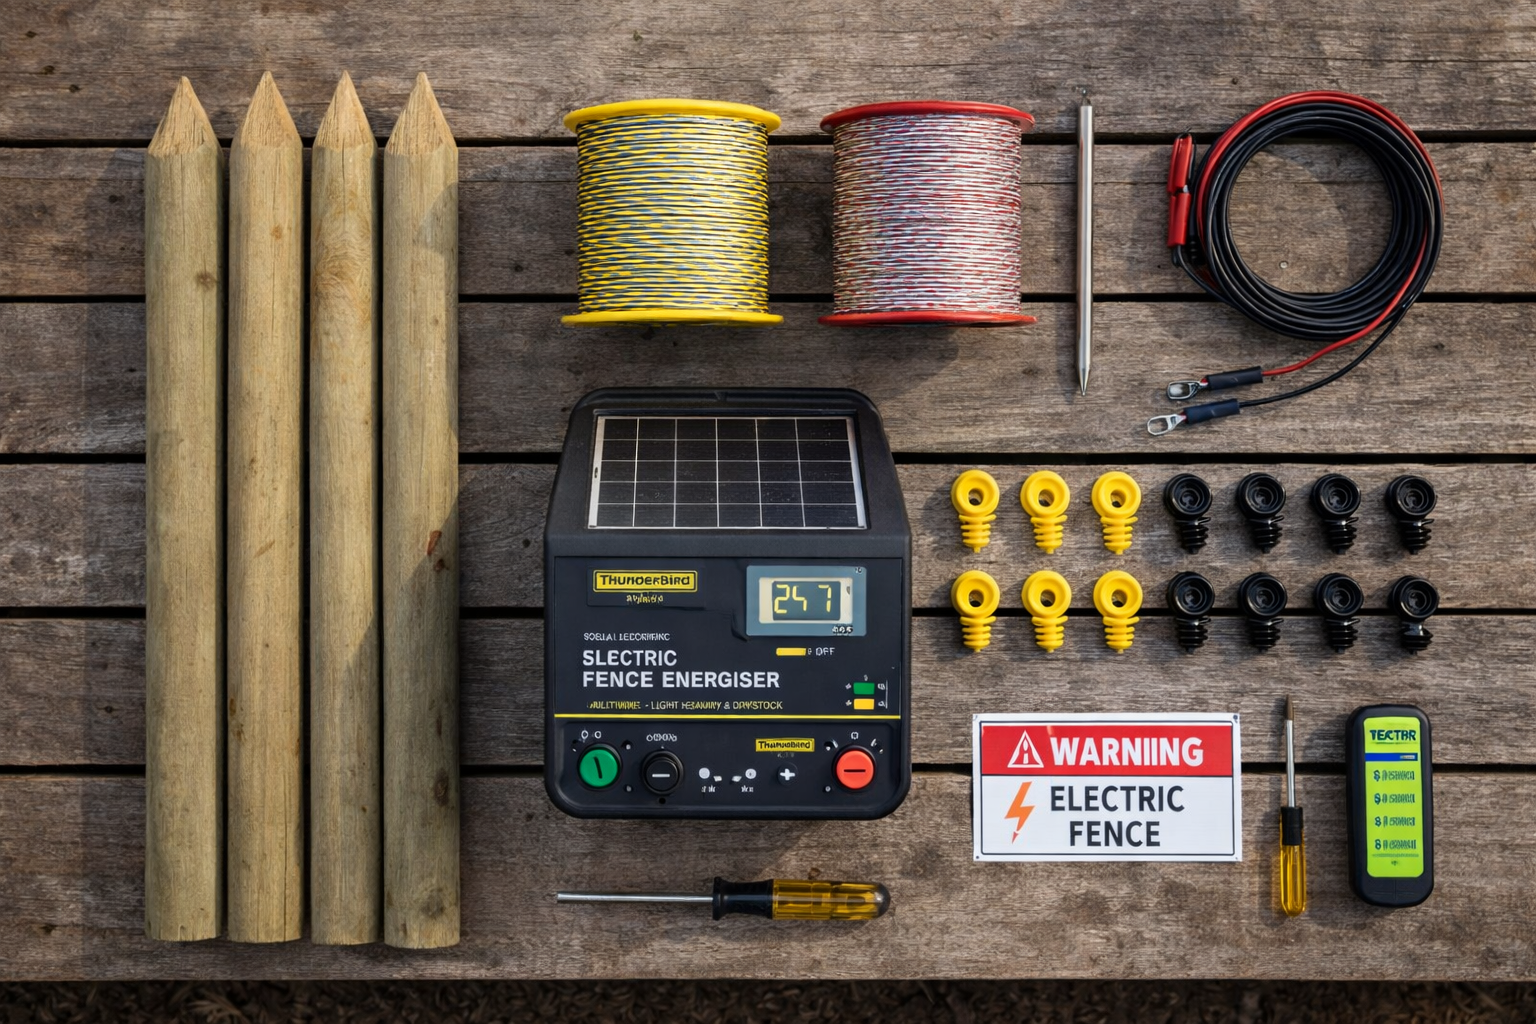
Before you begin your electric fence installation, take a few minutes to plan and gather your materials. A well-prepared setup helps your fence work properly and prevents common issues like weak voltage or poor grounding.
Here’s what you’ll need:
- Fence posts such as timber, steel, or tread-in poly posts
- Insulators that match your post type
- Electric fence wire or tape
- A correctly sized energiser
- A ground rod or earthing stake
- Lead-out cable
- An electric fence tester
Next, look at your property. Think about the total fence length, the type of livestock you’re containing, vegetation along the fence line, and how you’ll power the system. If you are fencing a remote paddock or off-grid area, a solar energiser is often the most practical choice.
How to Set Up an Electric Fence?
Electric fences are relatively easy to install, as long as the components are installed correctly and are properly grounded. A well-installed electric fence will operate safely and reliably.
Step 1: Plan Your Fence Layout
Plan the route that the fence will follow. Determine how many corners you will need and where the gate will be located.
Planning helps ensure that there is no excessive wire stretch or voltage drop, which can occur with longer wire runs.
Also, plan your fence layout around the livestock you are trying to contain. It's also a good idea to check excessive grass and weeds along the fence line.
High growth of vegetation along the fence line will affect the performance of the fence, as high growth of vegetation can drain power from the fence.
Clear the area before installing the fence, using suitable outdoor equipment or whipper snipper attachments to cut back grass and weeds along the fence line.
Step 2: Install the Fence Posts
Begin by installing the corner posts first. The corner posts bear the tension in the wire; they should be securely fastened.
Next, install the intermediate posts at even intervals along the line of the fence. The distance between the intermediate posts depends on the terrain and the wire being used.
Tread-in posts are great for setting up a temporary fence because they take less time and are very portable.
Step 3: Attach Insulators
Attach insulators to every post. These stop electricity from grounding into the post and help maintain a steady voltage.
Install them at a consistent height and make sure they are secure. Loose insulators are a common cause of voltage loss.
Step 4: Run the Wire or Tape
Thread your electric wire or tape through the insulators along the fence line. Keep the tension even, but do not over-tighten.
Make sure the wire does not touch vegetation, metal, or other conductive materials. Contact like this drains power from the system.
For cattle or horses, wider poly tape improves visibility. Poly wire is often suitable for smaller livestock or temporary fencing.
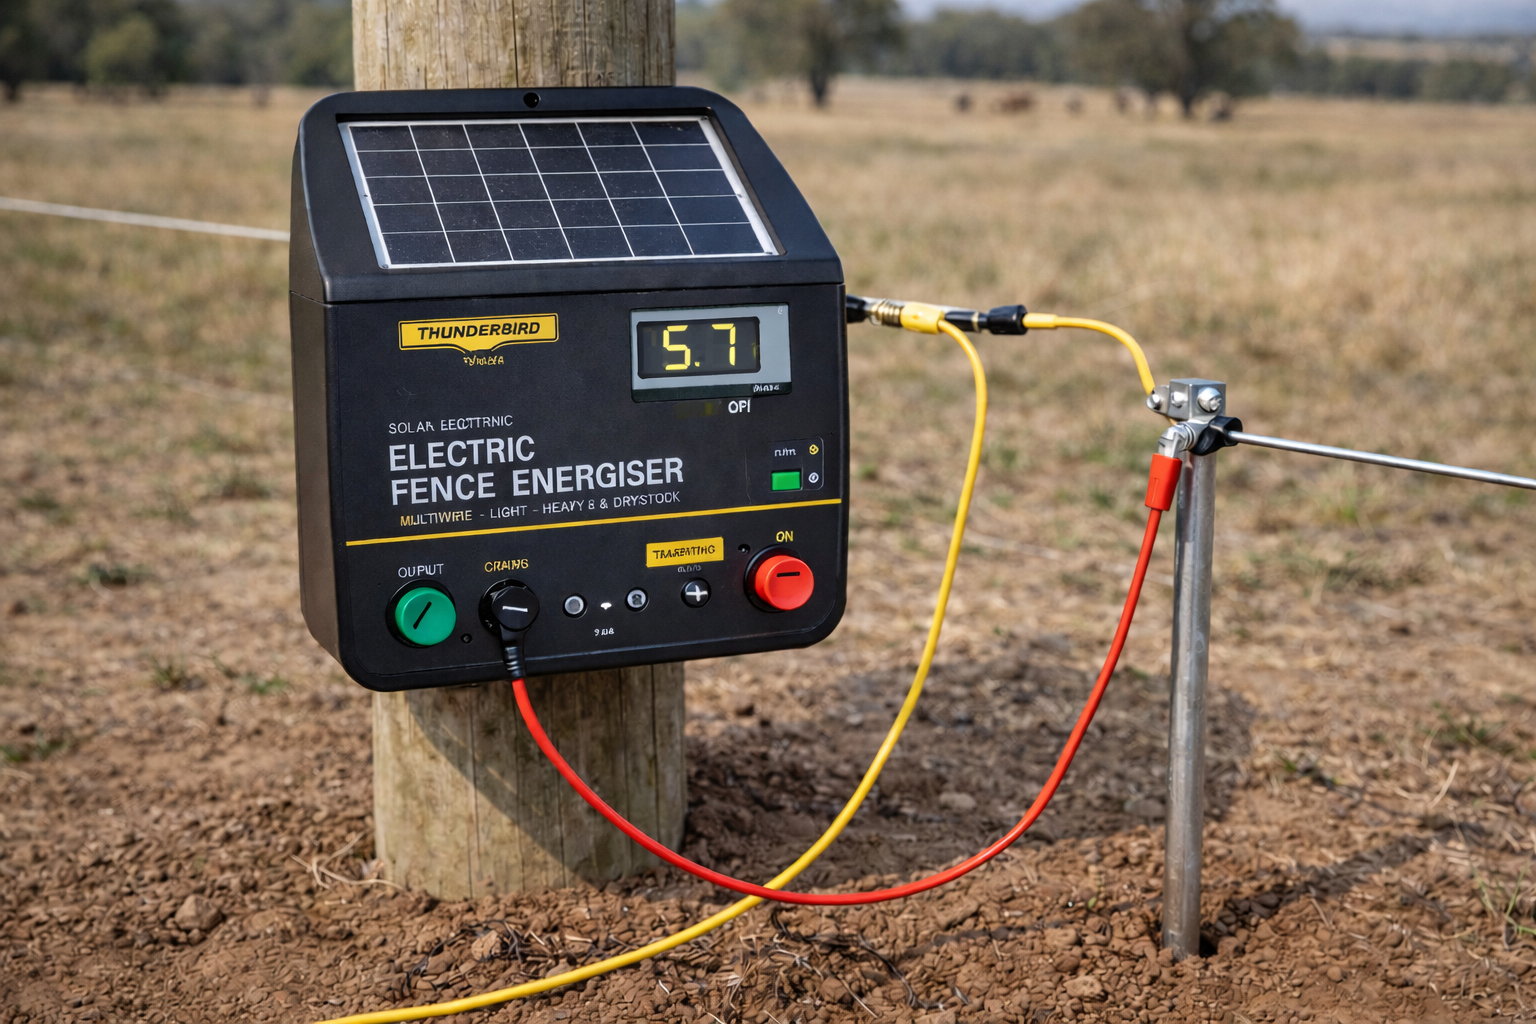
Step 5: Install the Energiser and Ground Rod
Mount the electric fence energiser in a secure location near the fence. Protect it from the weather if needed.
Connect the live terminal to the fence using lead-out cable. Then install the ground rod firmly into the soil and connect it to the earth terminal.
Good grounding is critical. Poor earthing is one of the most common reasons fences underperform.
If you do not have mains power available, a solar energiser is a practical off-grid option.
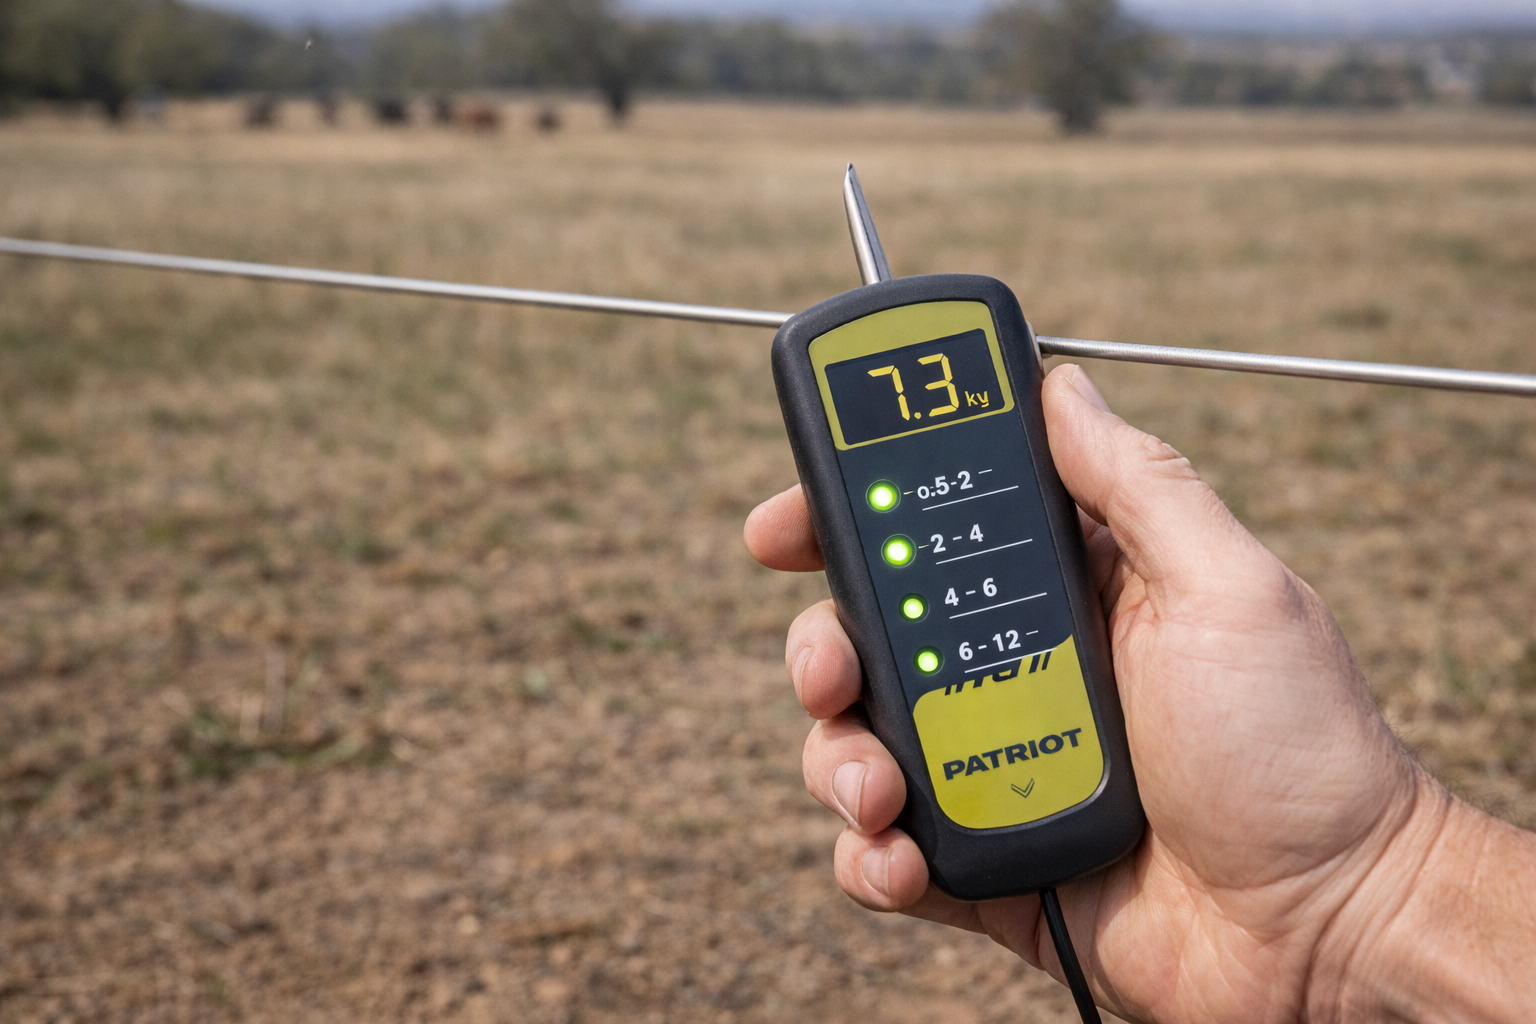
Step 6: Test the Voltage
Once everything is connected, use a fence tester to check the voltage at several points along the fence.
Types of Electric Fencing
Once you know how to install an electric fence, the next decision is choosing the right system for your property. The best option depends on whether you need a fixed boundary or a flexible setup that you can move as needed.
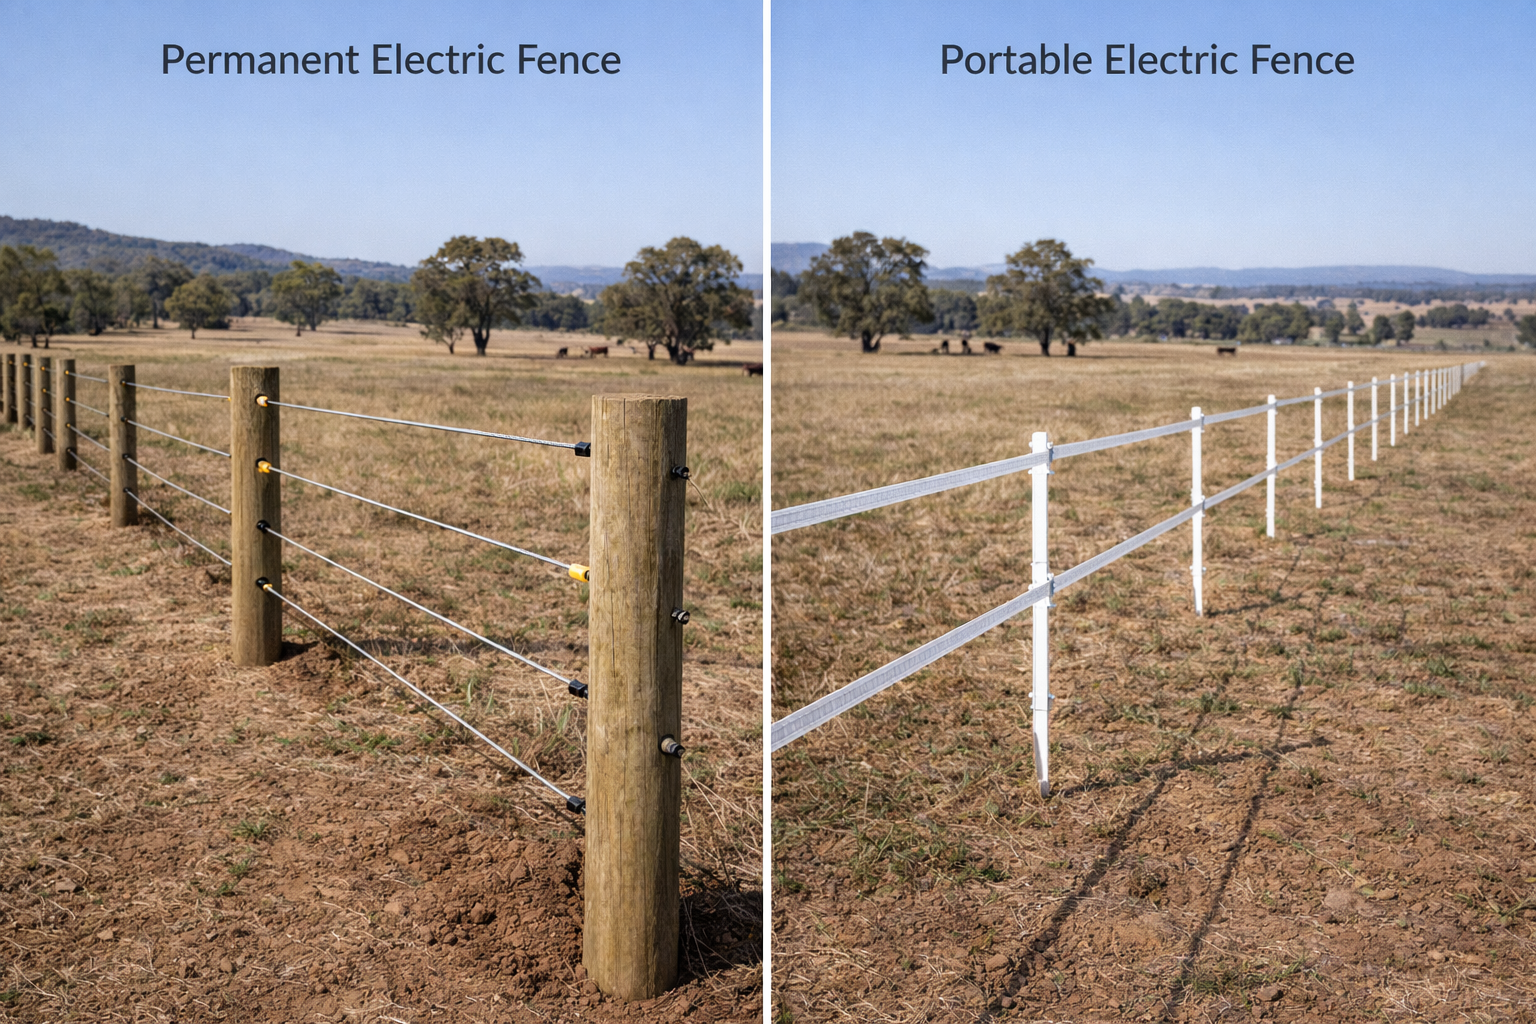
Permanent Electric Fencing
Permanent systems are built for long-term use. They are commonly installed along property boundaries or around fixed livestock areas.
These fences usually use high-tensile wire, timber or steel posts, and heavy-duty insulators designed to handle outdoor conditions year-round.
| Feature |
Permanent Fencing |
Portable Fencing |
| Best For |
Long-term boundaries |
Rotational grazing & temporary enclosures |
| Post Type |
Timber or steel posts |
Tread-in poly posts |
| Wire Type |
High-tensile wire |
Poly wire or poly tape |
| Flexibility |
Fixed position |
Easily moved |
| Installation Time |
Longer setup |
Quick setup |
| Ideal Use |
Large paddocks & property borders |
Smaller areas & livestock rotation |
Portable Electric Fencing
Portable systems are designed to be moved and often use tread-in poly posts with poly wire or poly tape, so they are quick to install and easy to relocate.
This type of fencing is great for rotational grazing, strip grazing, or creating temporary enclosures. Even though it is flexible, correct wire tension and good grounding are still essential for effective containment.
Choosing the Right System
Permanent systems are built for long-term use. They are commonly installed along property boundaries or around fixed livestock areas.
These fences usually use high-tensile wire, timber or steel posts, and heavy-duty insulators designed to handle outdoor conditions year-round.
 Components of an Electric Fence System
To install an electric fence properly, you need to understand how the system works. And for the fence to work consistently, every component must function correctly.
An electric fence operates as a complete circuit. The energiser sends short pulses of electricity through the wire. When an animal, like a cow for example, touches the wire, the current passes through the cow into the ground and then returns to the energiser through the earthing system.
Energiser
The energiser powers the fence. It converts mains electricity or battery power into high-voltage pulses that travel along the wire.
Energisers are rated in joules. A higher joule rating means more energy is delivered along the fence line. Longer fences or areas with heavy vegetation usually require a higher output to maintain reliable voltage.
Fence Wire or Tape
The wire or tape carries the electrical pulse around the fence perimeter.
High-tensile wire is commonly used for permanent fencing. Poly wire or poly tape is often used for portable systems. The right material ensures good conductivity and reliable performance in different weather conditions.
Insulators
Insulators attach the live wire to posts while preventing electricity from grounding into the fence structure.
If insulators are loose or incorrectly fitted, voltage can leak into the posts or soil. This reduces fence effectiveness. Always choose insulators that match your post type and fencing material.
Ground Rod and Earthing System
The ground rod completes the circuit. When an animal touches the fence, the current must return through the soil to the energiser.
Poor grounding is one of the most common causes of weak fence performance. Install the ground rod firmly into moist soil and ensure all connections are secure. Good earthing improves voltage consistency and overall reliability.
Common Mistakes to Avoid When Setting Up an Electric Fence
Even if you follow the steps carefully, small mistakes can weaken your fence. Most performance problems come down to grounding, voltage loss, or poor installation details.
Knowing what to watch for can save you time and frustration.
Poor Grounding
Weak grounding causes of low voltage. This happens if the ground rod is not driven deep enough or does not have good contact with moist soil, the electrical circuit cannot complete properly.
Install the ground rod firmly into damp soil and make sure all earth connections are tight and free from corrosion.
Vegetation Touching the Wire
Grass, weeds, and branches that touch the wire drain power from the fence. This becomes a bigger issue during wet seasons when vegetation grows quickly.
Keep the fence line clear to maintain steady voltage and reduce strain on the energiser.
Using an Energiser That Is Too Small
The energiser needs to be suited to your fence length and the type of animal being contained. Larger sections of fencing and those surrounded by thicker vegetation will require a more powerful energiser (one with a higher joule rating).
Do not choose an energiser based on fence length; instead, choose one based on the perimeter size of your entire fence.
Loose Connections or Damaged Insulators
Voltage leaks from loose connections or from insulators in poor condition. Most small problems will result in reduced voltage output.
Regularly inspect your fence and replace all damaged parts as soon as possible.
Irregular Post Spacing or Poor Tension
Posts spaced too far apart or unevenly tensioned can cause sagging. Sagging increases the chance of vegetation contact and power loss, especially in changing weather.
Keep posts evenly spaced and maintain consistent tension to ensure your fence stays straight and reliable.
Maintenance of an Electric Fence
Regular maintenance is essential to keep your electric fencing system operating safely and delivering consistent voltage. Even a properly installed fence can lose effectiveness over time due to weather, vegetation growth, or component wear.
Routine inspection helps prevent power loss, protects livestock, and extends the lifespan of your fencing equipment.
If you identify worn or damaged parts, repair or replace them as soon as you can. Small cracks and loose connections can reduce voltage across the entire fence line.
After you have replaced them, make sure they are compatible with your existing system and recheck voltage levels using a fence tester.
Recommended Maintenance Schedule
Establisha regular maintenance routine to prevent unexpected failures. Seasonal weather changes also require additional checks. Make sure you:
- Inspect fence wires, posts, and insulators weekly
- Test voltage output at multiple points along the fence line at least once a month
- Check energiser operation and battery condition regularly
- Inspect ground rods and connections every few months, especially during dry conditions
When selecting an energizer for your electric fence, choose one large enough to support your entire system because the reliability of your fence may be compromised.
Fence Length and Output Power
Energisers are rated in joules. This tells you how much energy the unit sends through the fence.
The longer your fence or the more wire strands you use, the higher the joule rating you will need.
Vegetation Along the Fence
Grass, weeds, and branches that touch the wire drain power from the system. So, if your fence runs through areas with frequent vegetation growth, choose one with a slightly higher output.
Type of Livestock
Different animals respond differently to voltage levels.
Cattle and horses usually require moderate to high output. On the other hand, sheep and goats may need stronger levels because of their wool.
Power Source: Mains or Solar
Energisers are available in mains-powered, battery-powered, and solar models.
If you have access to mains electricity, plug-in units provide constant power. For remote or off-grid areas, solar energisers are a practical option. They charge a battery during the day and continue operating overnight or during cloudy weather.
Get Electric Fencing Equipment at Jono & Johno!
At Jono & Johno, we supply fencing equipment built for Australian conditions. Our range includes energisers, wire and tape, insulators, testers, and complete fence kits to suit both permanent and portable systems.
Shop electric fencing equipment online or visit us in-store. All products are backed by a 12-month warranty for added peace of mind.